Skinning Moths the Kronos Way

Of course there is always more than one way to skin a moth. This is just how I do it - mostly. You’ll probably want to do something different. Sometimes I’ll do it differently. As with most things there is no substitute for experimentation.

What you’ll need...

  • Hardwar U2.02 or greater - earlier versions don’t support custom skins.
     
  • A reasonably good paint package. In principle you can produce a skin in Windows Paint, though I’d rather amputate my own legs with a rusty spoon. What you need is something which supports layers / objects (the terminology varies). A good selection of paint tools and effects is quite useful as well. Ulead PhotoImpact, Jasc PaintShopPro, Adobe Photoshop or Corel Photopaint should all do handsomely, though there are others.
     
  • Patience, especially at first. The way Hardwar interprets the bitmap you produce is rather idiosyncratic. Each different type of moth has it’s own rules and experience is the only guide to what will come out looking OK. Things to watch out for (though there are many more) are strange behaviour when you try and match a pattern from one panel to another, the solar panel area of the Police Moth being replicated on top of it’s rotating scanner, the fact that the tail fins of the Moon Moth can’t be skinned at all, and that the Swallow is very odd indeed.
     
  • The Hardwar Moth Viewer. This is essential - get it here. Without this, the only way to check how your moth is going to look is to fire up the game, and life is far to short for that.
  •  

    Using the Skinning Packs

    For each type of moth there is a template and a detail file. The template is a blank moth skin, with a few special features - such as air-intakes, thrusters and solar cells left in - basically the stuff which has some kind of function. Of course you can keep as much or as little of this as you want. I tend to like keeping stuff like solar panels in so the moth looks like it’s going to work. The detail file is used to give an impression of panel edges, and perhaps a little shading.

    Typically I’ll start with the template (layer 4), make the white transparent and place my main design as an object underneath it (layer 1). This might be a camouflage pattern, a Japanese flag like the example, an abstract painting... or absolutely anything. Regardless of what it is, it’s handy to have the template there as a guide, especially to positioning. Next, I might add some shading (layer 2). For this an airbrush tool and blur effects - especially motion blur if you’ve got it are very handy. Next comes the detail file (layer 3). Then, I may want to make some changes to the top layer - giving a fill pattern to the solar panels for example. If I’m adding a few bits of chrome, some shark teeth, or whatever, then I’ll do this now, and add them as separate objects, which will enable me to move or resize them if I have to. Then, I’ll adjust the transparency of each layer to get the desired effect. Finally, I’ll flood-fill the lime-green part of the template in a suitable colour so as to avoid any bits of that showing through on the final moth. The default skins are slightly flawed and don’t quite cover the whole area of the moth - this is more noticeable on some moths than others - particularly the Hawk and Death’s Head. There are other ways to tackle this problem but the flood fill is quick, easy, and surprisingly effective if you choose the right colour. The skin is then finished and all that remains is to collapse all the layers / objects together and save as a bitmap.


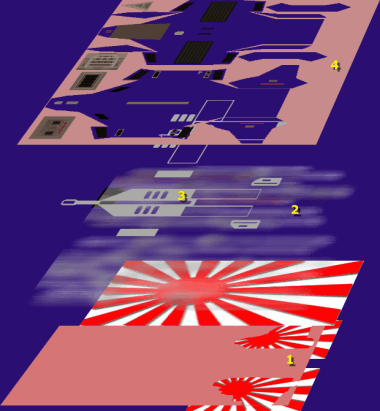
    Skin Design using Layers / Objects
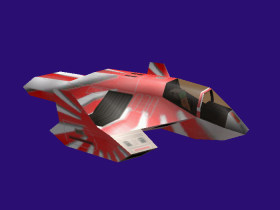
  • 1. The basic pattern
     
  • 2. Shading - this can be used to get an effect of weathering, combat damage, or even the underlying metal of the moth. Using more than one layer can produce quite sophisticated results.
     
  • 3. Detailing - giving the effect of panels and / or adding additional shading to the moth
     
  • 4. Template. flood-filled to eliminate that lime green “undercoat”. Of course, the template can be edited or objects placed on top of it.
  • ...the Final Result


    Tips & Tricks


  • Although the final skin has to be saved as a 24bit bitmap, working in object / layer format and saving as both .bmp and the paint-program’s native format as much as possible allows the skin to be tweaked on the basis of how things look in the Moth Viewer. Keeping a copy of the final skin in native format makes it much easier to reuse individual elements of it in later skins.
     
  • A brushed metal effect can be created by producing a narrow gray rectangle, using an “add noise filter” and then widening the rectangle by stretching it. Other metallic effects can be produced using plug-in filters. You should be able to find them on the net for your paint program, if you don’t have them already.
  • You don’t have to be artistic to produce a skin - there is an almost infinite variety of ready-made images available on the web and elsewhere.
  • The best way to learn about the eccentricities of particular moths is by practice and looking at others’ skins.
  •  

    Downloads

    Download the CK Skinning Pack

    (104 Kb)

  • All images are in .gif format to make the download smaller.
     Finished skins must be saved as 24 bit bmp files.
  •  

    Download the Hardwar Moth Viewer

  • The essential tool for all skinning artists.
  •  

    And Finally...

    I’m really curious to see what you can achieve with the skinning pack. If you’ve got a cool design, please zip it up email it to me and I’ll put it in the gallery. Unfortunately there won’t be a prize for any that are shown, but I’ll give you full credit for it.

    [Home] [Pilot's Guide] [Skins] [Skinning 101] [Silver Y Model] [Photo Album] [Links]

    [Vote for Captain Kronos in the Hardwar Top 50]